
Dermaplaning at home can give you similar results to what you’d get at a spa or dermatologist, if you do it correctly. With the right tools and process, you’ll remove peach fuzz and dull, dead skin cells to reveal smoother, softer skin. Plus, you’ll save time and money by doing it safely at home on your preferred schedule.
Benefits of Dermaplaning at Home
First of all, it’s much cheaper. The only real tool you’ll need is a dermaplaning tool, which typically costs less than $10. An appointment with your dermatologist may easily cost over $100. However, you usually get a follow-up treatment to help moisturize and reduce redness.
The other benefits are the same ones you’d get from a professional:
- Thorough exfoliation
- Makes it easier for skin products to absorb into the skin
- Makeup goes on smoother
- Skin looks brighter and smoother
Before Your First At-Home Session
Before you just grab a dermaplaning tool and get started, there are a few things to do before your first session. The most important thing of all is to avoid any exfoliating products a few days before dermaplaning. This may make your skin too sensitive and result in longer lasting redness and irritation.
Second, if you have any open lesions, such as acne, on your face, you may want to wait for the lesions to heal before dermaplaning. While dermaplaning at home may help reduce acne and lessen the appearance of scars, sliding the blade over an active breakout can make it much worse.
Pick the Right Dermaplaning Tool
At-home dermaplaning tools look slightly different than what professionals use. The blades aren’t as large or sharp to help avoid nasty cuts at home. Even professionals occasionally slip and cut a patient’s skin. So, you want to get a tool specifically designed for at-home use because it’s safer in untrained hands.
You can choose between battery operated, manual, multi-use, and single use options. Some of the best dermaplaning tools available include:
- Schick Hydro Silk Touch-Up Dermaplaning Tool ($16) – Inexpensive and comes with nine tools. Each can be used several times before it starts to dull. It’s an ideal tool for beginners.
- Dermaplaning Tool 9 Count ($15) – Inexpensive and includes nine folding tools. They’re perfect for travel and can be used multiple times each. They’re also made for beginners.
- Kitsch Dermaplaning Tool ($14) – Comes in 12 pack and can be used multiple times each. Provides sharp, yet gentle blades that work well for all skin types.
- Dermaflash Luxe ($200) – While expensive, the rechargeable sonic dermaplaning tool works great if you have thicker peach fuzz. The sonic pulses provide exceptional exfoliation with less irritation.
- Tweezerman Facial Razor ($18) – A much sharper blade than the other options on this list and best left to those more used to dermaplaning at home. Includes three blades and each lasts for up to three months of use. Try the Tweezerman Prep and Plane Facial Razors for a more beginner-friendly option.
Prep Your Skin
The first step is to gently cleanse your skin. Use a cleanser without any exfoliating beads. You don’t want to irritate your skin at all before dermaplaning. Once your skin is clean, dry it completely. Unlike the razors you use in the shower, your skin needs to be dry before using a dermaplaning blade.

Some experts recommend using a dermaplaning face oil like Jasclaire Dermaplaning Oil to help the blade glide more smoothly and reduce irritation. However, it’s not required. I’d recommend trying it both ways to see which you prefer.
Dermaplaning Your Skin

The actual process of dermaplaning at home requires just a few easy to remember steps:
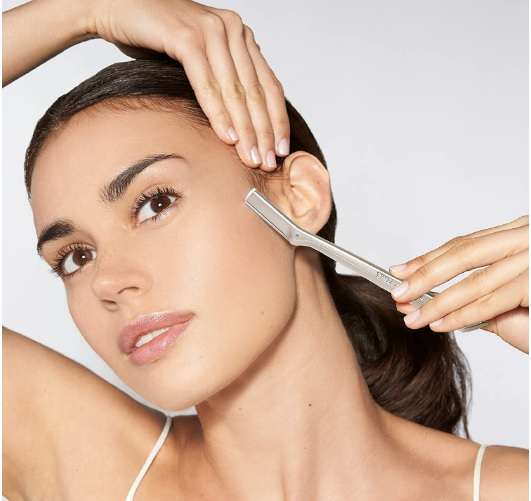
- Hold your dermaplaning tool at a 45-degree angle to your skin.
- Pull your skin tightly to avoid any snags.
- Press the blade gently, yet firmly against the skin. It shouldn’t dig into your skin at all. Just keep it on the surface.
- Use short, smooth strokes starting from the top of your jawline down your check. Repeat the process from top to bottom until both cheeks are finished.
- Use short strokes from just below your bottom lip to the bottom of your chin.
- Use short strokes between the hairline and your eyebrows. Avoid the actual hairline and eyebrows to avoid any accidental hair removal.
Avoid your nose and eyelids. The skin is very thin in these areas and you don’t really have any peach fuzz to remove in these areas anyway.
Apply a Gentle Toner
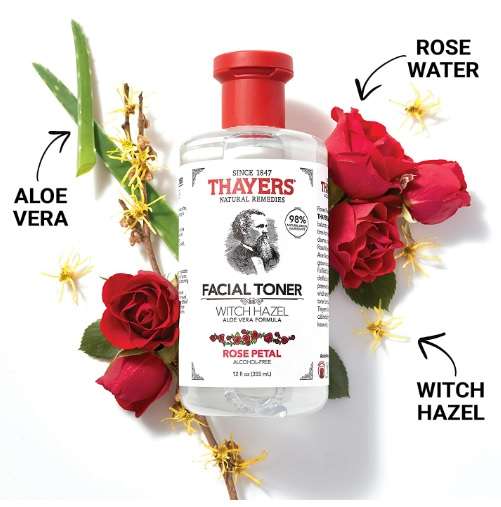
Apply a gentle toner to cleanse away anything left behind after dermaplaning. This cleans your pores and calms the skin to avoid lasting redness and irritation. An alcohol-free toner with witch hazel, like Thayer’s Rose Petal Witch Hazel with Aloe, works great to moisturize sensitive skin.
Moisturize
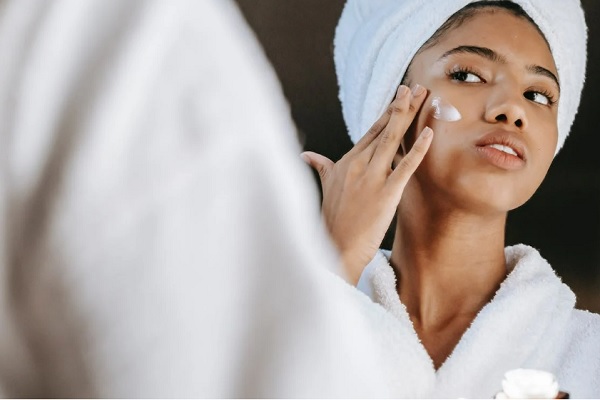
Since your skin is highly sensitive after dermaplaning at home, or at the dermatologist, it’s a good idea to skin any harsh treatments for now. For instance, skip your acne cream or spot treatment for the day. Only treat active lesions where you didn’t exfoliate the skin.
Instead, skip right to moisturizing using your favorite facial moisturizer. Your skin needs this to help repair itself and form a protective barrier now that all the dead skin cells are gone.
Frequently Asked Questions
How long should the redness last?
Some people don’t have any redness at all, but most people have at least a little. The sharper the blade, the more likely your skin will be red for up to a few hours after your session.
If it’s staying red for longer, it’s a sign you either pressed too hard or your skin is too sensitive for dermaplaning. If the redness continues for more than a day, contact a dermatologist for assistance.
What should I avoid?
Mainly, just be careful and don’t press the blade into your skin. Check out our list of dermaplaning mistakes to avoid to make your at-home session even better.
How often should I do it?
Dermatologists recommend dermaplaning about once per month. However, at-home tools aren’t quite as sharp, so you may be able to do it every 2-3 weeks. Always read the instructions with the tool you buy to see how often you should use it. Also, if you have really sensitive skin, less often is best.
Image credit: Andrea Piacquadio via Pexels


